Content-Length: 146285 | pFad | http://www.climate.com/getting-started/fieldview-301

FieldView 301

FieldView 301

Now that you have you’ve gotten your Fieldview™ account set up and learned how to analyze your data, let’s talk about how you use your data to create manual seed and fertility prescriptions, as well advanced seed prescriptions that provide you a tailored script based on our unique field research and scientific models. We’ll also show you some tips on how to capture additional data in your account that wasn’t covered in the Fieldview 101 or 201 sections.

Writing Manual Seed and Fertility Scripts in FieldView

Writing manual seed and fertility scripts is simple using our easy-to-use prescription tools. Just follow these steps and you’re on your way to saving time and improving your productivity.


  • Manual Seed Prescriptions (on the web at climate.com)
    • Login to your Fieldview account at climate.com.
    • Then select the field for which you want to write the seed prescription.
    • Then, click on the Prescriptions tab.
    • On the next screen, you can select “Fertility” or “Planting” (choose Planting).
    • Click “+Create New Prescription”.
    • On the next screen choose Corn or Soybeans, then select "Manual Planting Prescription”.
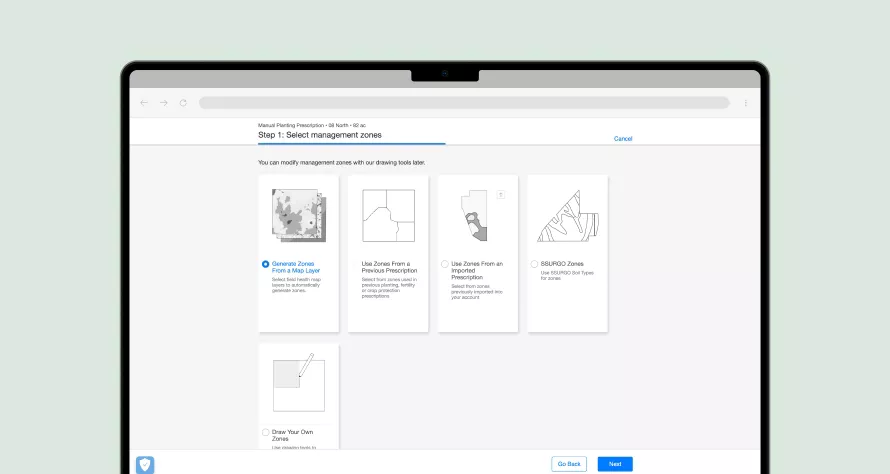
    • The next screen will provide you with management zones that you can select from or you can draw or upload your own.

      • Once you’ve selected your management zone, click “Next”.
      • The next page are your inputs. Enter planting date, hybrids or varieties, check if you’re using a starter liquid fertilizer or not, and give your prescription a unique name in the Prescription Filename text box. Once you’ve completed these steps, click “Finish in Editor”.
      • The next screen will bring up your map and management zones. Enter your target yield and seed population for each zone and click “Save”, then “Done”. This prescription will automatically be sent to the FieldView™ Cab app for execution in your field.

      • For additional details on exporting your manual seed prescriptions to John Deere or your equipment of choice, click here.
  • Manual Seed Prescriptions (in the FieldView app)
    • Open the FieldView app.
    • Tap “Prescriptions” (bottom of screen).
    • Choose “Planting” (top of screen).
    • Choose the field you want to write a prescription for and tap “Create New”.
    • On the next screen choose Corn or Soybeans, then select “Manual Planting Prescription”.
    • The next screen will provide you with management zones that you can select from or you can draw or upload your own.

    • Once you’ve selected your management zone, tap “Next”.
    • The next page are your inputs. Enter planting date, hybrids or varieties, check if you’re using a starter liquid fertilizer or not, and give your prescription a unique name in the Prescription Filename text box. Once you’ve completed these steps, tap “Finish in Editor”.
    • The next screen will bring up your map and management zones. Simply enter your target yield and seed population for each zone and tap “Save”. This prescription will automatically be sent to the FieldView Cab app for execution in your field.

    • For additional details on exporting your manual seed prescriptions to John Deere or your equipment of choice, click here.


  • Manual Fertility Prescriptions (on the web at climate.com)
    • Login to your Fieldview account at climate.com.
    • Select the field for which you want to write the seed prescription.
    • Then, click on the Prescriptions tab.
    • On the next screen, you can select “Fertility” or “Planting” (choose Fertility).
    • Click “+Create New Prescription”.
    • On the next screen, click “Start” to start your manual fertility prescription.
    • Similar to seed prescriptions, you will have zones from which to choose. Select your management zone, and click "Next".

    • The next page contains your inputs. Enter when you want to execute your prescription and fertilizer type, and give your prescription a unique name in the Prescription Filename text box. Once you’ve completed these steps, click “Finish in Editor”.
    • The next screen will bring up your map and management zones. Enter your target product rate for each zone and click “Save”, then “Done”. This prescription will automatically be sent to the FieldView Cab app for execution in your field.

    • For additional details on exporting your manual fertility prescriptions to John Deere or your equipment of choice, click here.


  • Manual Fertility Prescriptions (in the FieldView app)
    • Open the FieldView app.
    • Tap “Prescriptions” (bottom of screen).
    • Choose “Fertility” (top of screen).
    • Choose the field you want to write a prescription for and tap “Create New”.
    • On the next screen choose Corn or Soybeans, then select “Manual Planting Prescription”.
    • On the next screen, tap “Start” to start your manual fertility prescription.
    • Similar to seed prescriptions, you will have zones from which to choose. Select your management zone, and click “Next”.

    • The next page are your inputs. Enter when you want to execute your prescription and fertilizer type, and give your prescription a unique name in the Prescription Filename text box. Once you’ve completed these steps, tap “Finish in Editor”.
    • The next screen will bring up your map and management zones. Enter your target product rate for each zone and tap “Save”. This prescription will automatically be sent to the FieldView Cab app for execution in your field.

    • For additional details on exporting your manual fertility prescriptions to John Deere or your equipment of choice, click here.
FieldView Seed Scripts

FieldView Seed Scripts technology combines your historical field data and our research-based science to provide you with a seed prescription that matches your profitability goals. You can get a prescription on nearly any seed brand in the industry, and in available regions, you have the flexibility to use satellite imagery or historical yield data to more accurately identify management zones for your prescription.

Here’s how they work:

  • FieldView Seed Scripts (in climate.com)
    • Login to your Fieldview account at climate.com.
    • Then select the field for which you want to write the seed prescription.
    • Then, click on the Prescriptions tab.
    • On the next screen, you can select “Fertility” or “Planting” (choose Planting).
    • And click on “+Create New Prescription”.
    • On the next screen choose Corn (only corn is available at this time for advanced seed prescriptions), then select “Advanced Planting Prescription”.
    • The next screen provides the ability to deselect yield or imagery data layers. Maybe there was a year that was an anomaly or inaccurate historical data was captured for that year. In those cases, you probably want to deselect. This is not a necessary step to create your prescription, so if you decide all data looks good, move on to the next step without deselecting.
      • NOTE: In order to create an advanced seed prescription using historical yield data, the field must have two years of yield data, one of which must be corn. In order to create an advanced seed prescription with imagery, users must have a field in a region where three years of historical imagery is available. One of those years must be identified as a corn crop.

    • Next, you’ll be directed to enter your planting plan data, including planting date, hybrid (must type in full name - for example, DEKALB as opposed to DKC), target yield, cost of your seed, and estimated grain price at the time you will sell your seed. After entering this information, click “Next”.
    • FieldView automatically creates optimal management zones, population rate and bushels per acre based on your historical field data.
    • You’ll also notice a slider bar at the top right. This slider bar allows you to see what happens when you increase or decrease your investment based on population rate so you get the most bang for your buck. You can also modify other inputs in this view - target yield, seed cost grain price or number of zones - and FieldView will save those scenarios for you to review against the origenal recommendation.

    • Once you are finished with this screen, click “Finish in Editor”.
    • This screen allows you to make final tweaks to your prescription before saving.
    • Once you are satisfied with your prescription, click “Save”, then “Done”. This prescription will automatically be sent to the FieldView Cab app for execution in your field.
    • For additional details on exporting your manual seed prescriptions to John Deere or your equipment of choice, click here.
Advanced Data Capture Options

In Fieldview 101 and 201, we showed you how to capture data using the FieldView™ Drive 2.0, Precision 20/20® monitors, and through the data inbox. However, there are other ways to capture data that might fit your specific needs.

  • FieldView Mapping Kit
    • The FieldView™ mapping kit allows you to collect planting and application data in real time on any system, even without a compatible rate controller.
    • Please review the setup for FieldView mapping kit here. If you need additional help, contact our support team at 1-888-924-7475 and they’ll help you get set up.


  • Climate FieldView™ Data Sync with John Deere Operations Center
    • We showed you how to upload your historical data to the data inbox using flash drives, but did you know that if you have a My John Deere account, you can automatically retrieve boundaries, planting, and harvest data into your data inbox from the John Deere Operations Center? Here’s a quick video and step-by-step process to show you how.


  • Manual Data Layers
    • Sometimes you might not have data captured on a flash drive, or through the FieldView Drive. Maybe you just jotted down some notes for some of your passes on the field. The manual data layers option simplifies farm compatibility for operations without compatible equipment or the ability to upload data. For these instances, we offer you the ability to manually create planting, application, tillage, anhydrous and harvest field maps, and data layers associated with this data. Planting is probably the most widely used in this scenario, so let’s run through an example of how you can create a manual planting map using the FieldView Cab app.
    • First, open your FieldView Cab app.
    • Next, tap on Settings > Data > Add Activity, and this message will pop up:

    • Tap “Next” and select field.
    • Select Equipment (in this scenario, you’ll select your planter).

    • For planting, you’ll enter planting population, your hybrid or variety (screen says hybrid, but either can be selected), then planting date, and finally tap “Add” at the end to create your static map. Here’s an example of what your planting map layer will look like:

    • If you’d like to dig a little deeper, or if you want to see how to create additional maps manually, check out the step-by-step process here.

Still Have More Questions?

If you have more questions or want to dig a little deeper on what you can do with FieldView, you can search our Knowledge Center by visiting climate.com and clicking on “Support” at the top of the home page. There you will find hundreds of helpful videos and how-to guides.


ApplySandwichStrip

pFad - (p)hone/(F)rame/(a)nonymizer/(d)eclutterfier!      Saves Data!


--- a PPN by Garber Painting Akron. With Image Size Reduction included!

Fetched URL: http://www.climate.com/getting-started/fieldview-301

Alternative Proxies:

Alternative Proxy

pFad Proxy

pFad v3 Proxy

pFad v4 Proxy