Mathjaxのv2からv3へのアップデート
Github pages上で公開しているページのMathjaxのアップデートやったのでメモ。 v2からv3へのMathjaxの変更は公式ページに記載してある。
Upgrading from v2 to v3 — MathJax 3.2 documentation
公式から設定の変換ツールがあるので、設定の変換はツールを使っても良い。
ただGithub page上で表示しようとすると、kramdownとの相性問題で数式まわりの設定の微調整が必要だった。
特に数式は$と$$で書こうとするとworkaroundが必要になる。
最終的には以下のような感じで落ち着いた。
設定の読み込み
<script src="{{ site.baseurl }}/assets/js/config.mathjax.js" defer></script>
<script type="text/javascript" id="MathJax-script" defer src="https://cdnjs.cloudflare.com/ajax/libs/mathjax/3.2.0/es5/tex-mml-chtml.js"></script>
設定(inline数式は$でdisplay数式は$$でかける)
(function(_doc, _win) {
  window.MathJax = {
    loader: {
      load: ['[tex]/ams']
    },
    tex: {
      packages: {'[+]': ['base', 'ams']},
      // kramdown convert $a$ -> \\(\\). \\( is required to use kramdown
      // However, kramdown doesn't convert all of $ to \\(.
      // having $ in inlineMath allows us to convert the leftovers to math
      inlineMath: [['$', '$'], ['\\(', '\\)']],
      processEscapes: false, // use \$ to produce a literal dollar sign
      processEnvironments: true, // process \begin{xxx}...\end{xxx} outside math mode
      processRefs: true,
      tags: 'ams',
      macros: {
        diag: '\\mathop{\\mathrm{diag}}\\nolimits',
      },
    },
  };
})(document, window);
github pageはjekyllがkramdownを使ってmarkdownをwebpageに変換する。 このときmathjaxとmarkdownの記法に競合があるとうまく変換されない。 具体的には、例えば以下のような文章があったとき、
$A_{1} + A_{2}$の答えは$A_{3}$
理想的には、mathjaxの設定に追加したように$で囲まれた2つの数式部分を変換してほしい。
ただ実際には、kramdown側が_で囲まれた部分をmarkdownの記法だと判別し数式に変換する前にmarkdown用のtagを差し込む。
結果としてmathjaxは以下のような壊れた数式を変換しようとして変換がうまくいかない。
$A_{1} + A{2}$の答えは$A{3}$
問題はkaramdownは数式用の記載はskipするようになっているが 、mathjaxの設定で追加した$はkaramdown側では考慮されない。
ただ、dispaly数式の$$はkaramdownがdefaultでskipするようになっているので、こういう記法の衝突がある場合はinlineの場合でも無理やり$$を使えば正しく表示される。
同様に\eqref{test_equation_is_here}のようにlabelにunderscoreなどが含まれる場合もこれで対処できる。
使っているjekyllのversionなどは以下の通り。
group :jekyll_plugins do
  gem "jekyll", "3.9.1"
  gem "kramdown", "2.3.1"
  gem "kramdown-parser-gfm", "1.1.0"
  gem "webrick", "1.7.0"  # https://github.com/jekyll/jekyll/issues/8523
  gem "jekyll-theme-slate", "0.2.0"
  gem "jekyll-seo-tag", "2.7.1"
end
Could not fetch specs from https://rubygems.org/
rubyで bundle installしたときに
Could not fetch specs from https://rubygems.org/
のエラーが出る場合がある。問題の原因は色々考えられるが代表的な直し方は
ruby/bundleの再インストール
IPv6を使わない。OSXの場合は
System Preference -> Network -> Advanced -> TCP/IPで IPv6をLink-Local onlyにする。httpを代わりに使う。source http://rubygems.org/をGemfileにかく。
自分の場合はIPv6をlink local onlyにして解決した。
Reference
Zshでmvの補完をするとcommand not found: _mv
OSXのzshでmvとtypeした後にTABで補完すると以下のようなerrorがでる
mv (eval):1: command not found: _mv
もしくは
(eval):1: _mv: function definition file not found
原因はzshのinstall directoryのzsh/share/zsh/functions/ の _mv が何かの理由で読み込めてない。
以下のような対処法が考えられる。
zshを最新にする
brew uninstall zsh
brew install zsh
iterm/terminalを再起動する
zcompdumpを削除
compinitのcacheを作っている場合は削除する。
rm -f ~/.zcompdump*
exec zsh -l
iterm/terminalの使っているshellを変更する
自分の場合はitermのshellが/bin/zsh でdefaultでOSXに入ってるzshを使っていたのが原因だった。
homebrewでいれている場合は/usr/local/bin/zshにすれば良い。
Reference
Mathjaxで写像/関数の定義域の制限
Mathjaxでrestriction map/functionを書く。 基本的にはtex/latexと同じである。
method1
Definition:Restriction/Mapping - ProofWiki
Proofwikiやでは|の過度な仕様を避けるため、harpoon \(\upharpoonright\) 記号を使うことを推奨している。
f_{\restriction_{A}}
$$ f {\restriction_{A}} $$
method2
多くの本では以下の|が利用されている。
下記のlinkで紹介されているように、| をつける方法はいくつかある。
math mode - How to typeset function restrictions - TeX - LaTeX Stack Exchange
ちょっと長めの|
left. f \vphantom{\big|} \right|_{A}
$$ \left. f \vphantom{\big|} \right|_{A} $$
ちょっと短めの|
\left.f\right|_{A}
$$ \left.f\right|_{A} $$
\defでcommandを定義できるので、commandとして登録しても良い。
\defは使用するより前に宣言していれば良い。
$$
    \def\maprestriction#1#2{\left. #1 \right|_{#2}}
    \maprestriction{f}{A}
$$
$$ \def\maprestriction#1#2{\left. #1 \right|_{#2}} \maprestriction{f}{A} $$
Airflowのconfigで環境変数を使う
documentなどに明示的に記載されてないが、Airflowのconfig file airflow.cfgでは環境変数が使える。
AIRFLOW_HOMEが環境変数として設定されていれば、以下のようにかける。
[core]
# The home folder for airflow, default is ~/airflow
airflow_home = ${AIRFLOW_HOME}

# The folder where your airflow pipelines live, most likely a
# subfolder in a code repository
# This path must be absolute
dags_folder = ${AIRFLOW_HOME}/dags

# The folder where airflow should store its log files
# This path must be absolute
base_log_folder = ${AIRFLOW_HOME}/logs
また、config fileを使わず環境変数で直接設定することも可能。
formatは$AIRFLOW__{SECTION}__{KEY}の形式である。
SECTIONとKEYの間は_が2つであることに注意する。
上の例の場合は
export AIRFLOW__CORE__AIRFLOW_HOME=/path/to/airflow/home
export AIRFLOW__CORE__DAGS_FOLDER=/path/to/airflow/dags
export AIRFLOW__CORE__BASE_LOG_FOLDER=/path/to/airflow/logs
である。 環境変数がconfig fileの設定より優先されることに注意する。
scikit imageでHue(色相), Saturation(彩度)の変更をする
scikit-image: Image processing in Python — scikit-image
Hue(色相)とSaturation(彩度)の変更方法は、RGBをHSV変換して、HとSのchannelを変更すれば良い。 どの程度変更すれば良いかがわかりにくいので、GIMPと同じになるように値を調整したものを作成した。
- Hueの調整値: -180から180で指定
- Saturationの調整値: -100から100で指定
import skimage.color
import numpy as np


def to_valid_image(image):
    return np.clip(image, 0, 255).astype('uint8')


def adjust_hue_saturation_lightness(
        image, hue_range=0, hue_offset=0, saturation=0, lightness=0):
    # hue is mapped to [0, 1] from [0, 360]
    if hue_offset not in range(-180, 180):
        raise ValueError('Hue should be within (-180, 180)')
    if saturation not in range(-100, 100):
        raise ValueError('Saturation should be within (-100, 100)')
    if lightness not in range(-100, 100):
        raise ValueError('Lightness should be within (-100, 100)')
    image = skimage.color.rgb2hsv(image)
    offset = ((180 + hue_offset) % 180) / 360.0
    image[:, :, 0] = image[:, :, 0] + offset
    image[:, :, 1] = image[:, :, 1] + saturation / 200.0
    image[:, :, 2] = image[:, :, 2] + lightness / 200.0
    image = skimage.color.hsv2rgb(image) * 255.0
    image = to_valid_image(image)
    return image
使い方は以下のようになる。
import skimage.io

img = sikimage.io.imread(path_to_image)
# Hue + 50
img = adjust_hue_saturation_lightness(img, 0, 50, 0, 0)
skimage.io.imshow(img)
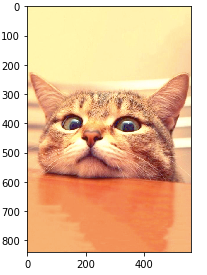
元画像

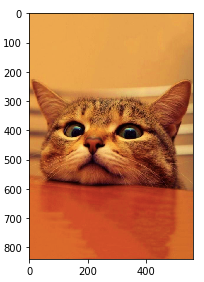
Hue + 50

Saturation + 50
Value + 50