Beyond the Milky Way
NGSS Connections
Touches on PE HS-ESS1-2 : Earth’s Place in the Universe
Touches on DCI ESS1.A: The Universe and Its Stars, PS4.A Wave Properties
Engages in SEP 4:Analyzing and interpreting data, 5:Using mathematics and computational thinking and CCC 1:Patterns, 6:Structure and function: The motion and make up of stars and galaxies provide evidence for the Big Bang theory.
One of the giant leaps in understanding that contributed to how we view our place in the universe was the confirmation that galaxies exist outside our own Milky Way. Before they were recognized as galaxies, these fuzzy objects were referred to as nebulae. One of the basic questions that was explored in an effort to understand what these objects were was, “Where are they?” With each increasingly powerful telescope, astronomers mapped the location of nebulae. What they discovered supported other evidence that these objects were distinct from stars in our Milky Way. The massive Sloan database places the distribution of stars and galaxies within easy reach. To do this, we begin by counting the number of stars and galaxies in different parts of the sky.
Sample the Sky
In order to compare the distribution of stars and galaxies in the sky, we need only to count the number of each at different locations across the sky. To do this in a scientific way, we should:
- Choose the locations to be sampled randomly.
- Use the same procedure for counting at each location.
Because the SDSS has not sampled the entire sky and there is a bias in where the survey has imaged, we are not able to create a truly random sample. Below is just one possible method for sampling. You may choose to try this one, modify the suggested procedure, or create your own. The steps are outlined below. The video walks you through the steps in more detail. If you are unfamiliar with the tools mentioned, it may be a helpful place to start.
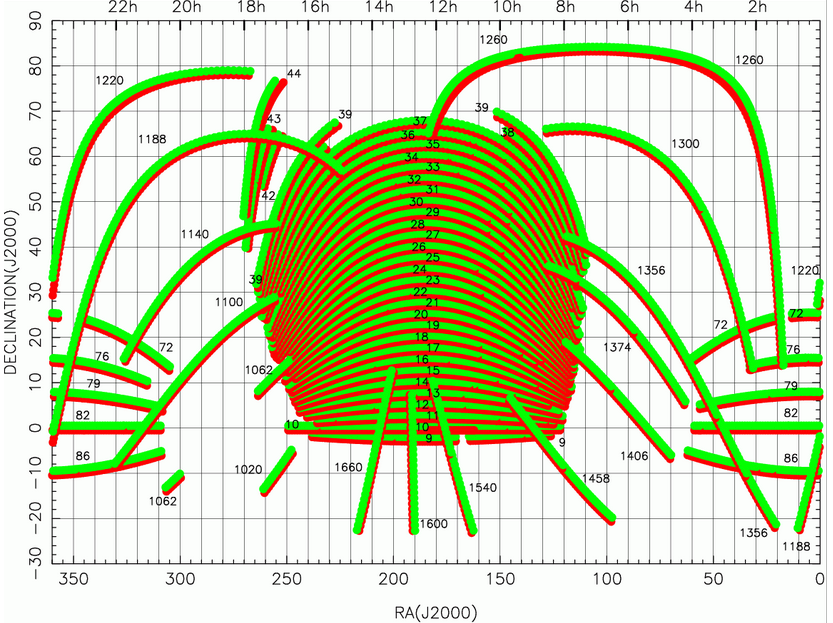
- Use the Stripe Coverage Map below to see where in the sky the SDSS has imaged.
- Choose your sample locations. At each 10 degrees declination (north-south), move across the map from left to right (east to west) sampling every 50 degrees right ascension. Sample the number of stars and galaxies each location starting at 350° (bottom x-axis). If there is no coverage at a particular point, move a maximum of up to 20 degrees east. If no data are available within that range, skip that location and move to the next location.
- Review each sample location in the SkyServer Navigate tool.
- Enter the coordinates (RA and Dec) for each sample location into the Navigate tool.
- Select Grid and Label in the Drawing options box.
- Click Get Image.
- With the scale at 0.7922 arc seconds per pixel or 1 arc minute per mark on the white grid, be sure the image does NOT show the edge of a stripe. If it does, shift the image window so that only star fields are shown. RE-CENTER on that location.
- OPTIONAL — View stars and galaxies at each location using the Chart tool. This step offers a good qualitative understanding of the data you will gather in the next step.
- Go to the SkyServer EZSearch tool
- Construct a 3 arcminute radial search at each location. This is approximately the same area that appears in the Navigate window from the previous step.
- Select the Count Only radio button and click Generate Query.
- Use the Submit Query to SkyServer button to return a count.
- Modify the query for each location, sampling for stars and then galaxies. The Update Query button must be activated each time before submitting the new query.
- Record your results in whatever way is convenient.
Stripe Coverage Map

Analyze Your Data
No matter what method or tools you use for analyzing your data, your goal remains the same: to compare the distribution of stars and nebulae (galaxies) across the sky. Below are some options to consider:
- What is the range of values you recorded? Across different declinations? Along different right ascensions?
- Averages are usually useful, but in this case they reveal little about distributions. If you are more familiar with statistics, the standard distribution might be a useful tool. Consider calculating it for different sections of the sky.
- You can create a variety of graphs using this data. Consider creating separate graphs from data of the number of stars and nebulae across right ascensions and declinations. If you are familiar with graphing tools such as Excel, you can create a three dimensional graph using both RA, Dec, and object counts.
Interpret Your Results
With graphs, statistics, and observations in front of you, think about the meaning of the information. Keeping in mind the original question, make a statement or conclusion from what you see. How confident do you feel in your conclusion? What else might you want to try? Why?
Next Question
 Once it was established that galaxies exist outside our own, the pursuit for the answer to the question, “How far?” was on. The first step astronomers took was to investigate methods for assigning distances to galaxies relative to one another. This is the next step on our expedition to an expanding universe.

